


Malto Mario


Feast


The Lady & Sons


1,000 Italian Recipes

Sunday, March 30, 2008

Dorie Rocks!

As ya'll know by now I'm sure, this month's hostess is the very lovely Morven, and she chose Dorie Greenspan's Perfect Party Cake which is featured in Dorie's BAKING: From My Home to Yours. (My baking bible) All I can say is that this was a great cake. Not very challenging but that's okay.. I need a breather once in a while.

3-23-08
Light and fluffy! Betchas didn't know how great a dog kennel doubles for a cooling rack, did you? :P

Morv allowed our imaginations to run wild in the flavor department. (Thanks sweetie!) So after much debate, I finally ended up staying with the lemon cake as written by Dorie and for the filling I decided to change it up a bit and went in search of something that tripped my trigger.

The West Side Market - you just have to love it. I found quite a little treasure trove of imported jams, preserves and jellies. I couldn't decide between Pineapple, Bitter Orange or Pear, so I bought them all. Hey!! I LIKE toast! Sheesh.. so judgemental. :P I also found a jar of imported Dulce de Leche.. so yeah, that went up to the cashier as well. :D

St. Dalfour Gourmet Pear Preserves.. *swoon*

I decided on the pear preserves but kicked it up a notch (ugh.. sorry Emeril) by dicing up 4 Bosc pears, and caramelizing them in butter and brown sugar until they were goldeny and well.. caramel-y. Delish!! I could have ate them piping hot, right there standing over the stove. As for the buttercream, I knew immediately what I wanted to do and that was salted caramel. *swoon*

Dorie's Perfect Party Cake
Wonderin' why there's no shots of the whole cake? Remember back in grade school when you were taught to "stop, drop and roll" if you were to catch on fire? What the hell was wrong with those people?? Tellin' kids they could catch on fire! No damn wonder I'm not right. :P Anyhoo.. I froze, frosted and sliced. :D

So a lemon cake, filled with caramelized pears and pear preserves topped off with salted caramel buttercream. Does that squick anyone out? I couldn't decide if I had a great flavor combo that many people would like.. or if I was just weird because it appealed to me. har!

Dorie's Perfect Party Cake

And if you were starting to feel a little despair at the thought of a challenge going perfectly well for me just because it wasn't exactly "challenging" well fear not, my lovelies.. I did manage a screw up - and a royal one at that! :D

*blush* I didn't read the recipe for the buttercream and just assumed it was the Italian meringue kind.. I know! Who the hell do I think I am just assuming, eh?

Dorie's Perfect Party Cake

Well, in ignorant bliss, I carried on making it the Italian meringue way, but instead of drizzling in the molten hot sugar syrup, I decide it'd be awesome if I were to cook that sugar until it was dark amber - hell yes! Can you imagine how caramel-y it would make the buttercream?? Yeah, well it doesn't. And for the love of Christ, don't try this at home. The instant the dark amber sugar syrup hit those cold whipped egg whites.. Mmmm... hmmmm.. *clunkedy* *clackedy* went my stand mixer. It sounded like there was GRAVEL in there. hahahaha!

I quickly threw that batch out. And then started my usual panic. :P

I decided that this would be an opportune time to actually read the recipe.. lo and behold it's the Swiss meringue variety. Go figger. Well, all I had to do was google caramel Swiss meringue buttercream recipe and there it was! I found an excellent recipe that was written exactly like Dorie's, except you make a caramel by cooking the sugar to that dark amber point, and then add heavy cream. You let that cool a bit, and then whip it into the buttercream after you've whipped in the last of the butter. What the recipe didn't tell me is that it would thin out my beautifully thick and creamy buttercream almost instantly. $#!*%

At this juncture, it was late and my sis was over for a visit so I had kind of passed the point of caring. So I pretty much just poured my buttercream over the caramelized pears on three layers, topped it off with the final layer of cake and popped it into the fridge to sit while I finished dinner. Oh yeah, and I threw my bowl of buttercream in the freezer too.

Dorie's Perfect Party Cake

Twenty minutes later I was rewarded with a set cake and gorgeously thick and creamy buttercream! *Snap!* (Did I just say Snap!? WTF?) I frosted that baby and sliced her up toot sweet! The cake was delish - although a little sweet for my tastes, believe it or not. I should have made my caramel a lil more saltier and I could have left the imported pear preserves off and just used the caramelized pears that I made - it would have been less sweet and that would have made this a truly perfect cake. :D

Thank you, Morv my love! And thank you, Dorie Greenspan! I will definitely make this cake again.. and I can't wait to play with more flavors!

Dorie's Perfect Party Cake
Any guesses to how many shots of a single slice of cake one person can take? :P

The new Daring Bakers are calling.. looks like we've got about another 100 some members joining in April - soon we will hit that 1,000 mark! Then.. world domination! :D

Dorie's Perfect Party Cake
'scuse me.. how many shots of a scraggly lookin' slice of cake one person can take? :P~

Do ya'll need me to remind you to visit the Daring Bakers Blogroll so you can drool over hundreds and hundreds of amazing cakes? Yeah.. I didn't think so. ;)

xoxo

Labels: , , , , ,

Tuesday, February 20, 2007

Recycling Really is a Good Thing

I've always been an adamant recycler.. we've got several bins to sort our trash in. Gotta do my thing for the environment, yanno? Well actually for the fishies, if I'm to be truthful.. I saw a picture of a poor lil fish that was strangled by one of those plastic thingies that links the cans in a 6-pack. So now, not only do I recycle my plastic 6-pack thingies, but I also cut them up into lil pieces - just in case. No one will ever be able to say that I killed a poor innocent lil schmelt.

Okay well now that I've given a lil too much information on one of my weirdnesses, I should explain that this post is not about recycling my aluminum and plastic products. No.. this post is about recycling banana cake! Dorie's banana cake, to be specific. =)

Banana Bread Pudding

I've probably made this cake about 8 times since November when I originally tried it. We both love it and think it's the best banana cake ever. This last time that I baked it, I wanted cupcakes/muffins to take to work, so I baked the batter in my cupcake tins. The good thing is they turned out wonderful, the bad thing is - the batter made 36 cupcakes! Not that's a really bad thing.. just way too many cupcakes for us to eat before they started going a lil stale.

I really didn't want to throw the last dozen or so out but it was too late to freeze. I decided that this would be the perfect opportunity to make Peabody's bread pudding again - I'll just sub the banana cupcakes/muffins in lieu of the croissants. Sheer genius! This time the pudding was even creamier as the cupcakes were still pretty moist. I added the jumbo raisins and they lent the perfect chew (I heart those jumbo raisins) to the very banana-ey bread pudding. And that's just it - this banana cake gets better with time - so the banana bread pudding had an outstanding banana flavor because the cupcakes were made about a week prior. I also made the toffee sauce and although these were plenty sweet on their own, yanno me.. gotta go for the over kill. =)

Banana Bread Pudding

I'm very happy with my first attempt at recycling a baked good and I look forward to trying this with something else one day.

As for a recipe.. I just made the banana cake batter as always, baked it in the cupcake tins for about 20 - 30 minutes. I stored them all in an airtight container, and a week later I tore them up and divided them up into 6 ramikins and then made Peabody's custard to pour over. Baked them for about 45 minutes until the tops were golden.. served 'em warm with a drizzle of the toffee sauce. *swoon* If you decide to recycle your own banana cake into bread pudding - be warned that the sauce, although big D lil licious, really is overkill as the pudding is sweet enough. =)

Banana Bread Pudding

Labels: , , ,

Sunday, December 03, 2006

A Biscotti Recipe, 4 Extremely Talented Bakers.. and Me. =)

*UPDATED* - Cinnamon Sugar Biscotti recipe added below

I just got done reading Peabody's, Brilynn's, Helene's and Ivonne's posts about their biscotti. I couldn't be more impressed and awed. What a fabulous job you guys did!! Thank you so much for joining Ivonne and I in baking this recipe! I truly look forward to next month and can't wait to see what we'll be making. :D Oh yes.. I've decided.. and made that executive decision without being anywhere nears an executive, that we shall do this again next month.. Oh yes, my friends, we shall. Muahahaa!

This was my first time baking biscotti. I've always paid the big bucks for these crunchy cookies and never even gave it a thought. Until Ivonne and I were talking about what to make this month and after suggestions of panettone (scared the bejebus outta me) and Christmas cookies, she came up with biscotti. My eyes lit up and a very large smile appeared on my face. Of course! Biscotti! Perfect! And so it was settled. By this time, I had already spoken with Peabody about her wishes to join us and Ivonne had spoken to Brilynn - so now the 2 of us had become 4. I was tickled. A few days later, as I was writing what seems to be my weekly letter to Helene, I realized she'd probably enjoy making biscotti too, so I invited her as well. I was very happy to find out that she was definitely up for it - now we had 5! And I was just delighted. =)

Well let me tell you.. had I known how easy it was to make such delicious biscotti in my own kitchen I would have NEVER shelled out a dime for those "gourmet" cookies I've always loved. Of course this is thanks to Dorie Greenspan and her fabulous book, Baking: From My Home To Yours. Kids? If you haven't bought or begged for this book yet, seriously - get on it. You will NOT be disappointed. Her inclusion of Thelma Labensky's recipe for Chocolate Biscotti was heaven sent. When I read the ingredients and saw espresso powder in the list, I knew this would be a damn good biscotto. And ohhhh is it! The cookie has a nice crunch and isn't too sweet. The chocolate is very pronounced, thanks to the espresso powder. I don't digest nuts well, so I left out the almonds but kept in the chunks of semi-sweet chocolate. Well duh. Aside from that, I followed the recipe to the T. Right up to the option of dipping them into white chocolate. Not a white chocolate fan here. Actually, I hate the stuff. BUT, my creative juices were flowin' and I thought adding cinnamon to white chocolate might make it good enough to eat. Alas, this did not come to fruition as my white chocolate would not melt. I used a double boiler and gently brought the heat up, but my chocolate would only melt to a thick, frosting like, consistency. So I chucked it. And then I ran to the freezer for my good semi-sweet stash and got on with the dipping!

Chocolate Biscotti
Adapted from Baking: From My Home to Yours by Dorie Greenspan, Houghton Mifflin Company, Nov 2006

2 c. all-purpose flour
1/2 c. unsweetened cocoa powder
2 TBS. instant espresso powder
3/4 tsp. baking soda
1/2 tsp. baking powder
1 tsp. salt
3/4 stick (6 TBS.) unsalted butter at room temperature
1 c. sugar
2 large eggs, lightly beaten
1 tsp. pure vanilla extract
1 c. chopped almonds, blanched or unblanched
4 oz. bittersweet chocolate, coarsely chopped, or 3/4 c. store-bought mini chocolate chips

Sugar for dusting

Getting Ready:
Center a rack in the oven and preheat the oven to 350º F. Line a baking sheet with parchment or a silicone mat.

Sift together the flour, cocoa, espresso powder, baking soda, baking powder and salt.

Working with a stand mixer, preferably fitted with a paddle attachment, or with a hand mixer in a large bowl, beat the butter and sugar together on medium speed until pale, about 2 minutes; the mixture may be crumbly. Scrape down the sides of the bowl, add the eggs and vanilla and beat for another 2 minutes; don't worry if the mixture looks curdled. Reduce the mixer speed to low and mix in the dry ingredients in 3 additions, mixing only until a dough forms. Scrape down the sides of the bowl. Mix in the chopped nuts and chocolate, then turn the dough out onto a work surface and knead in any dry ingredients that might have escaped mixing.

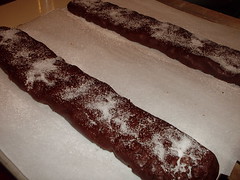
Divide the dough in half. Working with one half at a time, roll the dough into 12 inch long logs. Flatten both logs with the palm of your hand so that they are 1/2 to 1 inch high, about 2 inches across and sort of rectangular, then carefully lift the logs onto the baking sheet. Sprinkle each log with a little sugar.

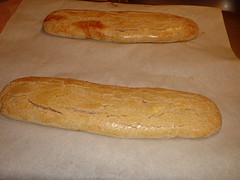
Chocolate Biscotti ready to bake

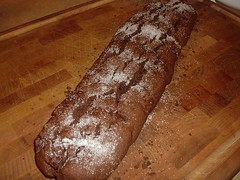
Bake the logs for about 25 minutes, or until they are just slightly firm. The logs will spread and crack - and that's just fine. Remove the baking sheet from the oven, put it on a cooling rack and cool the logs for about 20 minutes. (Leave the oven on.)

Chocolate Biscotti 1st bake

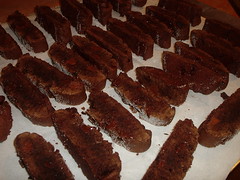
Working with one log at a time, using a long serrated knife, cut each log into slices between 1/2 and 3/4 inch thick. Stand the slices up on the baking sheet - you'll have an army of biscotti - and bake the cookies again, this time for just 10 minutes.

Chocolate Biscotti 2nd bake

Transfer the biscotti to a rack to cool.

Makes about 40 cookies.

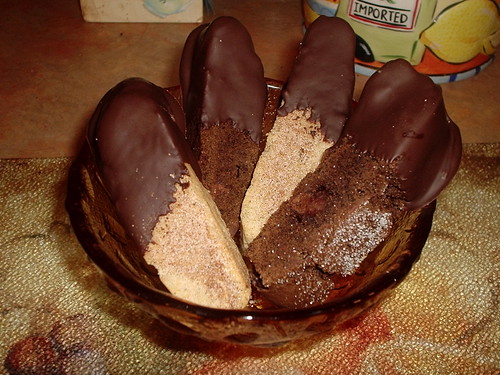
Chocolate Biscotti and Cinnamon Biscotti Dipped

Playing Around:
Chocolate-Cherry Biscotti: As impossible as it seems, these are even more irresistible than the original version. Add 1/3 co. of chopped dried cherries to the dough along with he almonds and chocolate.

White Chocolate Dipped Biscotti: Have a baking sheet lined with a silicone baking mat or a sheet of parchment or wax paper at hand. Gently melt 12 oz. finely chopped white chocolate or 2 c. store bought white chocolate chips in a heatproof bowl over a saucepan of simmering water, and scrape the chocolate into a narrow heatproof container. One by one, dip the biscotti into the chocolate, coating them to their midpoints. Lay the biscotti on the mat or paper, and when they are all dipped, slide them into the refrigerator for about 15 minutes to set the white chocolate.

My Notes:
I must have cut mine thicker than Dorie's as I only had 30 biscotti. Also pictured are cinnamon biscotti that I also made. They were equally delightful - with a big kick of cinnamon for you cinnamon lovers. Unfortunately, I'm about done tuckered out tonight, so I'll post the cinnamon biscotti recipe tomorrow morning. =)

Cinnamon Sugar Biscotti
Courtesy of Mollie and All Recipes

2 c. all-purpose flour
1 1/2 tsp. ground cinnamon
1 tsp. baking powder
1/4 tsp. salt
2/3 c. sugar
6 TBS. butter
1 egg
1 egg yolk
1 tsp. vanilla
1 egg, beaten

3 TBS. sugar
1 tsp. ground cinnamon

Preheat oven to 350º F. Line a baking sheet with parchment paper.

Sift together the flour, 1 1/2 tsp. cinnamon, baking powder and salt, set aside.

In a medium bowl, cream together the 2/3 c. sugar and butter. Beat in 1 egg, egg yolk and vanilla. Stir in the dry ingredients. (I used my stand mixer for all of this)

Divide the dough in half. Working with one half at a time (you'll need to knead this dough a bit to get the unmixed dry ingredients incorporated thoroughly), roll the dough into 9 inch long 1 1/2 inch wide logs. Flatten both logs with the palm of your hand slightly, then carefully lift the logs onto the baking sheet. Brush with beaten egg.

Bake for 20 to 25 minutes in the preheated oven, until golden and firm to the touch. Cool for 15 minutes.

Cinnamon Biscotti first bake

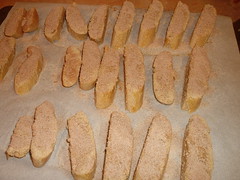
On a cutting board, slice each log crosswise at a diagional into 1/2 inch slices, using a serrated knife. *Note: see below for notes on slicing. Place back on baking sheet, cut side down and sprinkle with a mixture of the remaining cinnamon and sugar.

Cinnamon Biscotti 2nd bake

Return to the oven for an additional 10 minutes, until toasted. Cool on wire racks and store in an airtight container.

Makes 20 biscotti.

My Notes:
Thanks to advice from Alton Brown (I heart you AB!), I used my electric knife to cut both varieties of biscotti. I hardly had any crumbles at all. Also, if you don't have an electric knife, another tip I picked up was when cutting with a serrated knife, press down instead of sawing - helps to reduce crumbling.

Serving:
You can serve these with coffee - espresso, cappuccino, latte, or plain-old-poured-from-the-pot coffee - red wine, milk or ice cream. Or, if you stick them in a cookie jar and leave them onto he counter, they'll just about serve themselves.

Storing:
By their very nature, biscotti are good keepers. They'll keep in a cookie jar or an open basket for a week or more. Wrapped airtight, they can be frozen for up to 2 months.

Labels: , , , , ,

Wednesday, November 22, 2006

Speaking of Bananas

I've been debating on whether it's okay for me to share this and have decided that I think it's okay, as I've seen a few of my favorite bloggers share more recipes from that now (I'd say) famous book, Baking: From My Home to Yours by Dorie Greenspan. Oh yes, my friends, I did not stop baking from it after the Cookbook Spotlight event, oh noo I did not. :D

Banana Cake

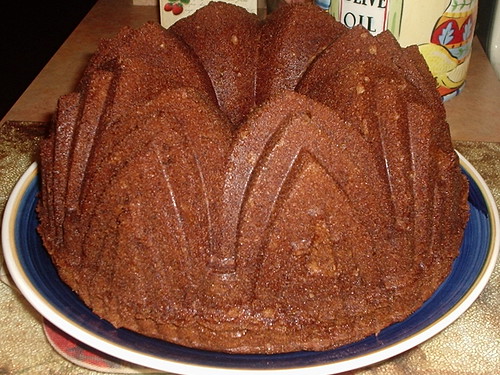
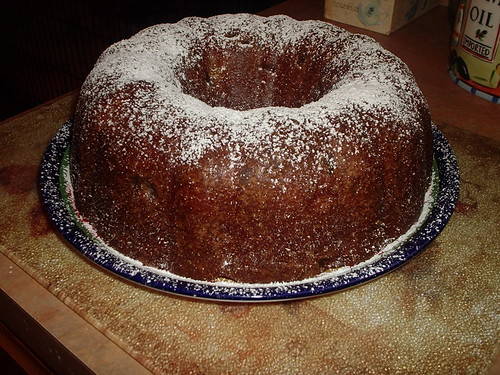
You see that picture? That's me showing off my brand new fancy pants Bundt pan. Okay well it's that AND it's showing off the best freaking banana cake recipe in all the world. I thought I had a really good banana cake/bread recipe in my repertoire already, but oh how wrong I was. This is now my favorite and I truly doubt I'll ever go in search of a new recipe again. Moist, extremely banana-y, not too dense and with each passing day it just kept getting better and better. All of that and I even think I baked it too long. It browned up pretty quick in my new cake pan, next time I'll shave a good 5 minutes off and cover it with foil around the 30 minute mark. I didn't even wait for my bananas to ripen much. But by the taste you would think that they were brown/black by the time I used them and they weren't at all. There's even an added bonus to this recipe - you will not believe how good your WHOLE house will smell while this baby is baking. Hello!

To give credit where credit is due, this is not an original Dorie recipe, but a favorite recipe of Emily Einstein, who with her husband, Dan, owns Sweet Sixteenth bakery in Nashville. Way to go Emily! =)

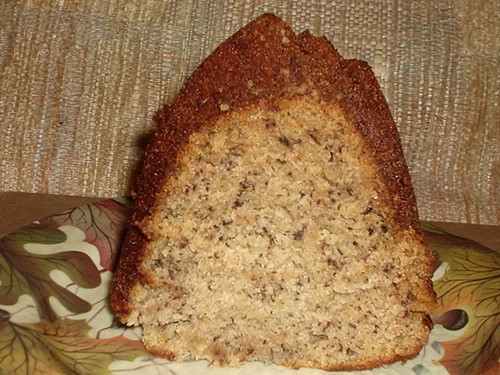
Banana Cake slice
Classic Banana Bundt Cake
Adapted from Baking: From My Home To Yours by Dorie Greenspan, Houghton Mifflin Company, November 2006

3 c. all-purpose flour
2 tsp. baking soda
1/2 tsp. salt
2 sticks (8 oz.) unsalted butter, at room temperature
2 c. sugar
2 tsp. pure vanilla extract
2 large eggs, preferably at room temperature
about 4 very ripe bananas, mashed (you should have 1 1/2-1 3/4 cups)
1 c. sour cream or plain yogurt
1 generous tsp. vietnamese cinnamon (Optional, recipe didn't call for it but I always add cinnamon to banana cake/bread)

Getting Ready:
Center a rack in the oven and preheat the oven to 350º F. Generously butter a 9- to 10-inch (12-cup) Bundt pan. (If you've got a silicone Bundt pan, there is no need to butter it.) Don't place the pan on a baking sheet - you want the oven's heat to circulate through the Bundt's inner tube.

Whisk the flour, baking soda, salt and cinnamon, if using, together.

Working with a stand mixer, preferably fitted with a paddle attachment, or with a hand mixer in a large bowl, beat the butter until creamy. Add the sugar and beat at medium speed until pale and fluffy. Beat in the vanilla, then add the eggs, one at a time, beating for about 1 minute after each egg goes in. Reduce the mixer speed to low and mix in the bananas. Finally, mix in half of the dry ingredients (don't be disturbed when the batter curdles), all the sour cream and then the rest of the flour mixture. Scrape the batter into the pan, rap the pan on the counter to de-bubble the batter and smooth the top.

Bake for 65-75 minutes, or until a thin knife inserted deep into the center of the cake comes out clean. Check the cake after about 30 minutes - if it is browning too quickly, cover it loosely with a foil tent. Transfer the cake to a rack and cool for 10 minutes before unmolding onto the rack to cool to room temperature.

If you've got the time, wrap the cooled cake in plastic and allow it to sit on the counter overnight before serving - it's better the next day.

Dorie also provides a Lemony White icing recipe to drizzle over the top of the cake, but I didn't feel it needed anything to improve it.

Lemony White Icing:
Sift 3/4 cup confectioners' sugar into a bowl and squeeze enough fresh lemon juice (start with 2 tsp. and add more by drops) to make an icing thin enough to drizzle down the Bundt's curves.

Labels: , , , ,

Friday, November 03, 2006

Spotlight on Baking: From My Home To Yours by Dorie Greenspan

I'm not going to say too much about Baking: From My Home To Yours because I don't want my knack for going on and on about something (keep scrolling - it really does eventually end) to overshadow the simple truth about Dorie's latest book.

I'm not a big baker. I feel I am a novice in the kitchen when it comes to baking anything more complicated than a simply frosted cake or an apple crisp. There are a lot of baking books out there that don't take into consideration the average home cook and his/her lack of experience or knowledge of baking. This book is the exception. There are some complicated recipes included in the pages of Baking, but not one of them looks as if it couldn't be accomplished by an average home cook as well as someone who has lots of experience in baking. It is for that simple reason and not the pretty pictures or the large variety of baked goodie recipes, that has me loving this book so very much. This is a book that I will buy for friends and family so they can enjoy it as much as I have. This is a book that I will continue to refer back to when I want to make something special. This is a cookbook that I thoroughly enjoyed reading as opposed to just searching for a recipe and following the instructions.

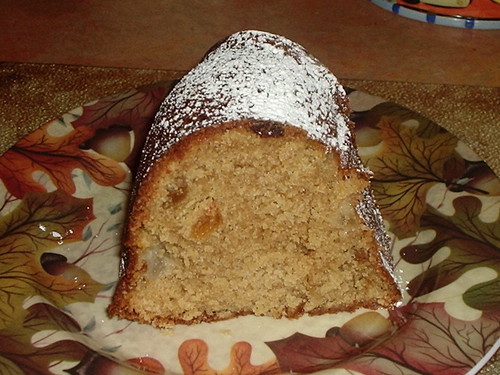
My last go at one of the recipes from this book was Dorie's Brown Sugar Bundt Cake. As much of a lover of all that is chocolate and all that is apples that I am, this was my favorite recipe by far. It was super easy to put together and the end result was a very moist caramel tasting cake loaded with plump golden raisins and sweet bosc pear chunks throughout.

I'll be making this cake again, and often. I found it to be perfect for breakfast! I think that next time, I'll be baking the batter in muffin tins and maybe changing up the fruit. Caramel and bananas sound good!

Brown Sugar Bundt Cake
Adapted from Baking: From My Home To Yours by Dorie Greenspan, Houghton Mifflin Company, November 2006

2 1/4 c. all-purpose flour
1/2 c. ground hazelnuts or walnuts (or 1/4 c. more all-purpose flour)
1 tsp. baking powder
1/2 tsp. baking soda
1/4 tsp. salt
2 sticks (8 oz.) unsalted butter, at room temperature
2 c. (packed) light brown sugar
3 large eggs, at room temperature
1 1/2 tsp. pure vanilla extract
1/4 tsp. pure almond extract (only if you're using the ground nuts)
1 c. buttermilk, at room temperature
2 medium pears, peeled, cored and cut into 1/4-inch dice.
1/2 c. moist, plump prunes, snipped into 1/4-inch pieces, or 1/2 c. moist, plump raisins (dark or golden)

Confectioners' sugar, for dusting

Getting Ready:
Center a rack in the oven and preheat the oven to 350º F. Butter a 9- to 10-inch (12 cup) Bundt pan, dust the inside with flour and tap out the excess. If your pan is not nonstick, dust the interior of the pan with flour, then tap out the excess. (If you've got a silicone Bundt pan, there's no need to butter or flour it.) Don't place the pan on a baking sheet - you want the oven's heat to circulate through the Bundt's inner tube.

Whisk together the flour, nuts, baking powder, baking soda and salt.

Working with a stand mixer, preferably fitted with the paddle attachment, or with a hand mixer in a large bowl, beat the butter and sugar together at medium speed until light and fluffy, about 3 minutes. Add the eggs one at a time, beating for 1 minute after each addition. Beat in the vanilla and the almond extract, if you're using it. Reduce the mixer speed to low and add the flour mixture and the buttermilk alternately - add the flour in 3 additions and the buttermilk in 2 (begin and end with the dry ingredients). Mix only until the ingredients are incorporated and scrape down the bowl as needed. With a rubber spatula, stir in the pears and prunes. Scrape the batter into the pan and smooth the top with the spatula.

Bake for 60 to 65 minutes, or until a thin knife inserted deep into the center of the cake comes out clean. (If the cake looks as if it's browning too fast, cover the top loosely with a foil tent.) Transfer the cake to a rack and cool for 10 minutes before unmolding, then cool to room temperature on the rack.

When you are ready to serve, dust the top of the cake with confectioners' sugar.

*Dorie's Note 1: Dorie suggests, if you have the time, to wrap the cake well and leave it on the counter to ripen the flavors for a day before serving.

*Dorie's Note 2: This cake will keep well for about 5 days wrapped well and at room temperature and can be frozen for up to 2 months, defrost still wrapped.

*Playing Around: For a nuttier cake, use 2 cups all-purpose flour and 3/4 c. ground nuts - hazelnuts, walnuts or almonds. Decrease the vanilla extract to 1 1/4 tsp., and use the almond extract. Omit the pears and prunes and stir in 1 cup of chopped toasted nuts - use the same nut as the one you ground.

*Lisa's Notes: I can't have nuts, so I omitted the ground and the almond extract, which gave me a very caramel tasting cake. I also substituted golden raisins in lieu of the prunes just because it's what I had on hand. I did eat this cake the day of baking as well as every freaking day after (5 days!) and it did get better with each passing day. *swoon*

Brown Sugar Bundt slice

Labels: , , , ,

Monday, October 30, 2006

A Rare Evening Post...

Good evening!

I'm usually in la-la land right about now, but I just got done watching a scary movie (I just love Halloween, don't you?) so therefore I must think happy thoughts for at least a half hour before I'll be able to sleep! ha!

Nothing makes me happier than chocolate! Okay well yeah, some other things do.. but tonight - it's chocolate! And my first post of a recipe I've made from Dorie Greenspan's new cook book, Baking: From My Home To Yours.

When the very sweet Sara of i like to cook asked me if I'd like to participate in another Cookbook Spotlight event, I was just tickled pink, as I really enjoyed participating in the first Cookbook Spotlight featuring Kitchen Sense by Mitchell Davis. And then I read a lil more of her e-mail and saw that Dorie Greenspan's new book was being featured - I was more than excited! Before I discovered food blogs I had never heard of Dorie. I had never even heard of Pierre Herme. I know!! Where the hell had I been? Ahh well, I'm use to being the last to know about a lot of things.. such as life.

So back to my excitement. I couldn't type YES! fast enough. I sat in front of my PC just waiting to hear back from Sara letting me know my e-mail got to her. And Sara? It's probably a good thing you are way up north, cuz if you were any where within reaching distance you would have gotten a great big smooch from moi for thinking of me! :D It wasn't too long after that night that I received what I thought was a nice sized slab of marble inside a cardboard box, sitting on my door step. Holy crap is this book heavy! Practically tripping over the kids when I rushed into my house to tear the box off, I could not wait to flip through the pages and commence in drooling. And ohh.. did I drool. Seriously? I need to have that looked at. Anyhoo.. deciding on two recipes to try was pretty damn close to impossible. So I went with 4 *blush* - keeping in mind I finally decided on 4 after making a list of at least 20. :P

The first two recipes I tried, I'm not going to share the recipes for, since I am really only allowed to blog about 2. But I will tell you the Korova or "World Peace" Cookies are fanfarkingtastic. And my first batch didn't even turn out right! Completely my fault though. I had a very hard time cutting the dough so they turned out "rustic" looking, to say the very least. I saved the 2nd half of the dough for another day, but wrote to Anita of Dessert First (bless her!) and asked her if she'd mind telling me what I was doing wrong. Her diagnosis? I might have cut them too thin and I didn't let my dough sit out long enough to soften properly before cutting. Thank you so much, Anita! My go at the 2nd log of dough turned out beautifully. But that is just aesthetics - the taste of these cookies is truly the main attraction. A deep, deep chocolate flavor with hits of salt throughout. I'm kind of thinking that these cookies should be renamed yet again.. "A Girl's Best Friend" cookie is more like it. ;) I'll be making these quite often!

The 2nd recipe I tried was my very first attempt at tarte Tatin. It was simply beautiful and tasted even better. My apples were fanned out perfectly, my puff pastry was puffy in all the right places and I did not burn myself while inverting it onto a plate! 'kay well, that would be because Hubbs did it for me. But he didn't burn himself either. ha! I thought this dessert was complicated to make when I first heard of it, but was nicely surprised that it's very simple and easy - especially with Dorie's instructions to guide me. I didn't even mind peeling and slicing all those apples! The only difference in my tarte Tatin and Dorie's was that I sliced my apples and fanned them out in the skillet, where she quartered hers. Something tells me though, that she wouldn't mind. =)

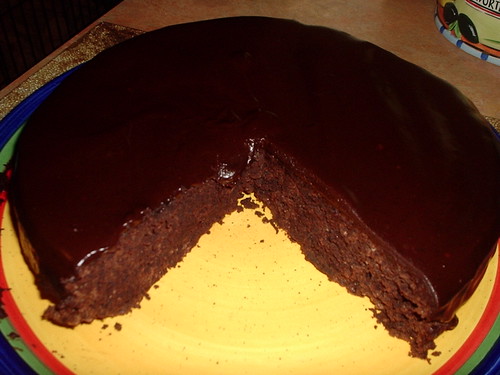
Now this brings me to the third recipe.. Almost Fudge Gâteau. A flourless (almost!) chocolate cake that will send shivers down your spine. Dorie's recipe was quite different from the other flourless chocolate cake that I've made as it calls for meringue to be folded into the chocolate batter. That was my one and only problem with making this cake. The chocolate "batter" is quite stiff and dense and when I tried to gently fold in the light meringue it took quite a bit of effort to incorporate it. The batter did get nice and fluffy, but I'm not quite sure if I depleted most of the air that was whipped into the egg whites in my "folding" as the cake did not raise too much. Actually, I'm not sure it was suppose to raise much. I've only got the other cake I previously mentioned to compare it to, and that cake was very dense and probably about as thick as a single layer cake. So I'm not sure if this cake turned out correct or not. But! As for taste.. wow. Just.. wow. The bittersweet chocolate made a not very sweet cake, which I adore. The chocolate is very intense in flavor and in scent. My kitchen smelled heavenly. Or at least, what I'd like to imagine heaven smelling like. The texture was slightly dry, but still quite fudgy. I am guessing that my oven runs hot, as I took the cake out at the minimal time recommended for baking, which might have caused it to over bake a bit. Regardless though, the pure chocolate rush along with the melt in your mouth texture would take much more than a few moments of over baking in a too hot oven to ruin this cake. By the by, I did opt for the bittersweet chocolate ganache poured over top.. I'm a firm believer in there can never be too much chocolate! A beautiful and decadent treat for the serious chocolate lover, for sure!

Almost Fudge Gateau
Almost-Fudge Gâteau
Adapted from Baking: From My Home To Yours by Dorie Greenspan, Houghton Mifflin Company, November 2006

5 large eggs
9 ounces bittersweet chocolate, coarsely chopped
1 c. sugar
5 TBS. unsalted butter, cut into chunks
2 TBS. coffee or water (I used coffee)
1/3 c. all-purpose flour
Pinch of salt

For the Glaze (optional)
4 ounces bittersweet chocolate, coarsely chopped
1/2 c. heavy cream
2 tsp. light corn syrup

Getting Ready:
Center a rack in the oven and preheat the oven to 350º F. Butter a 9-inch springform pan, line the bottom with parchment paper, butter the paper, dust the inside of the pan with flour and tap out the excess. Place the pan on a baking sheet lined with parchment or a silicone mat.

Separate the eggs, putting the whites in a mixer bowl or other large bowl and the yolks in a small bowl.

Set a heatproof bowl over a saucepan of simmering water and add the chocolate, sugar, butter and coffee. Stir occasionally until the chocolate and butter are melted; the sugar may still be grainy, and that's fine. Transfer the bowl to the counter and let the mixture sit for 3 minutes.

Using a rubber spatula, stir in the yolks one by one, then fold in the flour.

Working with the whisk attachment of the mixer or a hand mixer, beat the egg whites with the pinch of salt until they hold firm but glossy peaks. Using the spatula, stir about one quarter of the beaten whites into the batter, then gently fold in the rest. Scrape the batter into the pan and jiggle the pan from side to side a couple of times to even the batter.

Bake for 35 to 45 minutes, or until the cake has risen evenly (it might rise around the edges and you'll think it's done, but give it a few minutes more, and the center will puff too) and the top has firmed (it will probably be cracked) and doesn't shimmy when tapped; a thin knife inserted into the center should come out just slightly streaked with chocolate. Transfer the pan to a cooling rack and let the cake rest for 5 to 10 minutes.

Run a blunt knife gently around the edges of the cake and remove the sides of the pan. Carefully turn the cake over onto a rack and remove the pan bottom and the parchment paper. Invert the cake onto another rack and cool to room temperature right side up. As the cake cools, it may sink.

To make the optional glaze:
First, turn the cooled cake over onto another rack so you'll be glazing the flat bottom, and place the rack over a baking sheet lined with parchment or wax paper to catch any drips.

Put the chocolate in a small heatproof bowl.

Melt the chocolate over a pan of simmering water or in a microwave oven - the chocolate should be just melted and only warm, not hot. Meanwhile, bring the cream to a boil in a small saucepan. Pour the hot cream over the chocolate and stir very gently with a rubber spatula until the mixture is smooth and shiny. Stir in the corn syrup.

Pour the glaze over the cake and smooth the top with a long metal icing spatula. Don't worry if the glaze drips unevenly down the sides of the cake - it will just add to it's charms. Allow the glaze to set at room temperature or, if you're impatient, slip the cake into the refrigerator for about 20 minutes. If the glaze dulls in the fridge, just give it a gentle heat from a hairdryer.

Labels: , , ,