It is with a bit of mirth and a lot of white hot frustration that I write this post regarding my contribution to Laura Rebecca's Retro Recipe Challenge #1. For those of you who have been reading my lil blog, you might remember this post about a carrot cake or this post, about a meringue cake or even this post, about a chocolate mocha cake. Although the carrot cake and the chocolate mocha cake were fantastic in taste, I ranted about my frosting technique (or lack thereof) and how horrible they looked. We won't even mention the meringue cake for fear that remembering that catastrophe could, indeed, cause my head to explode. Well as you might have guessed, my contribution to the Retro Recipe Challenge is yet, another, cake. A cake that required frosting. Gah.
I could have waited to find a main dish recipe, an appetizer, a sandwich for crissakes.. but I was starting to panic as I've been in search of a retro recipe for a couple weeks now and haven't come up with anything that caught my fancy. I meant to get to the library, but didn't make it.. Laura Rebecca sent me some great links to some retro recipe sites, but alas, nothing there sparked my interest. Today I was going through some of my desert cookbooks to find something to bake as I've been doing each Sunday for the past three months. Low and behold, my Betty Crocker's Ultimate Cake Mix cookbook has retro recipes in it and I didn't even realize! This book was the source for the "unmentionable" meringue disaster, but that did not phase me (I guess it should have.) in the least - I was just so happy to find these recipes from the 50's and 60's! I decided to go for the "Velvet Cream Cake". This cookbook was featuring the modern recipe for a Lemon Velvet Cream Cake, but on the bottom of the page was a blurb about the original Velvet Cream Cake, made in 1960, with the recipe for the frosting used.
The cake is delicious. Even for a boxed mix, which yes.. I'm a cake snob. I'm not real fond of cake mixes and only use them in certain recipes, but this was not bad. Not bad at all. The frosting is delicious as well.. it just looks really, really bad when I'm appointed the "froster". The cake was moist and chocolatey and the cream cheese/whipped cream frosting was light and not too sweet, which is perfect to go with the choclate ganache that is poured over the top and drizzled down the sides.
Ready to hear about the high blood pressure causing events that followed after my cakes had cooled?
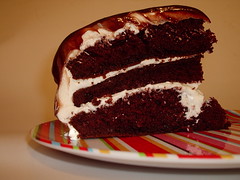
I had warmed up my heavy cream and tossed my chocolate in to melt for the ganache before I began. The first step in frosting this cake is to cut the two layers in half so you have 4 layers of cake. Apparently, I do not have what it takes to cut straight across, so my layers were bumpy. But that's okay! That's what frosting is for, right? To level out the playing field! Alrighty, I've got my first layer of cake set on the little wax paper "dams" I placed on the cake stand to catch the frosting that would inevitably fall while I frosted. Carefully place first good blob of velvety frosting on the middle of the cake and with frosting spatula, swish and spread the frosting so that most of it would be at the edges (as this cake only shows the frosting peeking between the layers and isn't actually frosted on the sides) so far, so good! Place 2nd layer of cake on top and continue frosting in same manner as the first layer.. this time with a few more crumbs mixed in but what the hell? They weren't going to show. Time to cut that second layer of cake in half, so set the spatula back in the bowl of pristinely white frosting and move to the other counter. Stick tongue out of corner of mouth to help with concentration, begin to slice through the cake thinking that these two layers are going to be perfectly level, dammit. Realize that knife is coming up out of the top of the cake. Curse a few times and slide tongue to other side of mouth. Reverse knife back to middle of cake and cut deeper to the opposite side. Lift top off and feel a little tension.. see that cake is not cut completely through because of assinine reversal of knife technique. Decide at this point that you've stopped giving a damn already and just pull the two layers apart. At least that top layer will be even when you invert it on the cake. Go back to bowl of frosting and see that you've set the crumb filled spatula right in the middle of the frosting. Curse again. Remove spatula and use finger to slide crumbly frosting off. Place frosted finger in mouth and think about how to get remaining crumbs out of remaining frosting. Decide once again, tough shit. Move on. Frost third layer. Look over at ganache and decide to incorporate the chocolate with the cream. After you've got it at it's glossy best, look over to cake and see a huge blob of frosting somehow landed on the side of the cake. Choose to either remove blob of frosting or just frost the damn sides and be done with it. Go with the latter. Stand back and take a look at your masterpiece. Decide it doesn't look half bad. Stick out bottom lip, raise left eyebrow and nod head twice. Not bad at all. Get a little overly excited and grab the ganache that has been sitting there and pour on middle of cake waiting for it to spread out to the edges and drizzle down sides. Look a bit confuzzled as ganache did not spread to edges but kind of pooled in the middle. Use previously licked finger to remove all white and crumbled frosting from spatula and then attempt to spread the ganache towards edges to watch it finally drizzle. Look on in horror as it does not drizzle, but instead cascades over the sides in what looks to be a chocolate avalanche. Horror mounts as you realize that it's separating on the top producing splotches of not so pristine white frosting. Stamp your foot. Throw spatula in sink. Curse. Curse again. Watch dogs run from kitchen in fear. Pull out the f'in wax paper and quickly move f'in cake to "photography room". Take a few pictures. Curse. Cut a slice. Take a few more pictures before realizing that there should be FOUR layers, not THREE. Look back over on counter and see the last layer sitting on the cooling rack. Curse again. Take one more picture right before cake layers start sliding off each other. Quickly walk away from cake before you do something you'll regret.
Laura Rebecca.. I'm sorry that my contribution isn't as glorious as what I had in mind when I started my day. But know, only because I heart you, that I am sharing yet another frosting monstrosity with the internet.
Dear Readers, I present.. the Betty Crocker Velvet Cream Cake circa 1960:
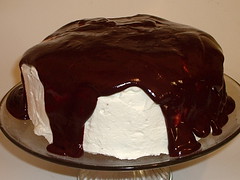 Velvet Cream Cake Velvet Cream Cake
1 package Betty Crocker SuperMoist Devil's Food cake mix
1 1/4 c. water
1/3 c. vegetable oil
3 eggs
For the Velvet Cream
3 oz. cream cheese, softened
1 TBS. milk
1 tsp. vanilla
2 c. whipping (heavy) cream
2/3 c. powdered sugar
For the Ganache
2/3 c. heavy cream
6 oz. semi-sweet chocolate
Preheat oven to 350º F. Grease bottoms of 2 round pans, 8" or 9" x 1 1/2", with shortening.
Make cake mix as directed on package, using water, oil and eggs. Pour into pans.
Bake 8" rounds 30 to 35 minutes, 9" rounds 25 to 30 minutes, or until toothpick inserted in center comes out clean. Cool 10 minutes. Run knife around side of pans to loosen cakes; remove from pans to wire rack. Cool completely, about 1 hour.
Split each cake layer horizontally to make 2 layers. Fill each layer and top with 1/2 c. Velvet Cream. Pour ganache carefully onto top center of cake; spread with large spatula so it flows evenly over top and down to cover side of cake. Store loosely covered in refrigerator.
Gah. Labels: Cake, Chocolate, Desserts, Kitchen Disasters, Retro Recipe |