Malto Mario


Feast


The Lady & Sons


1,000 Italian Recipes

Monday, March 17, 2008

Mario Batali, Have I Told You Lately How Much I Love You?

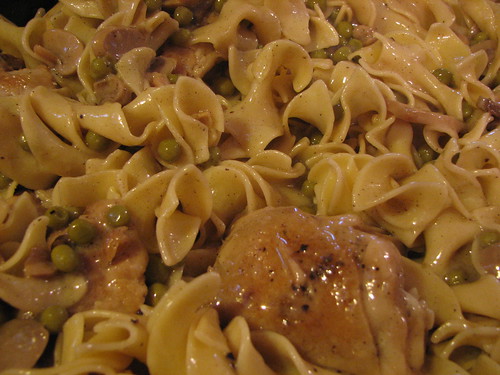
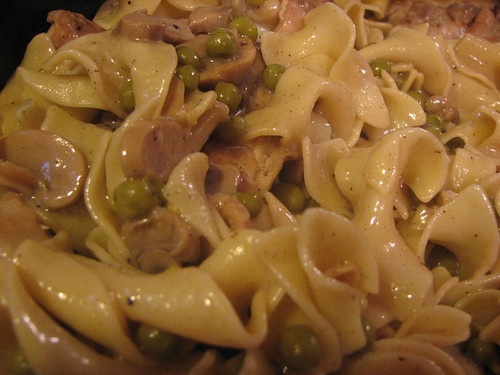
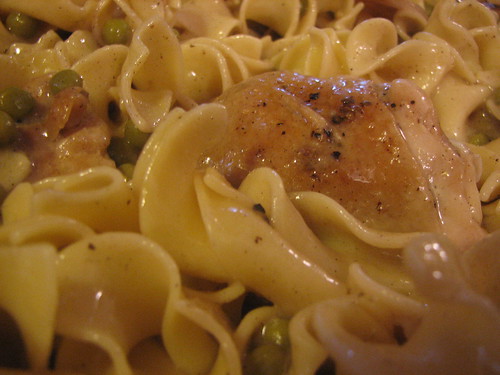
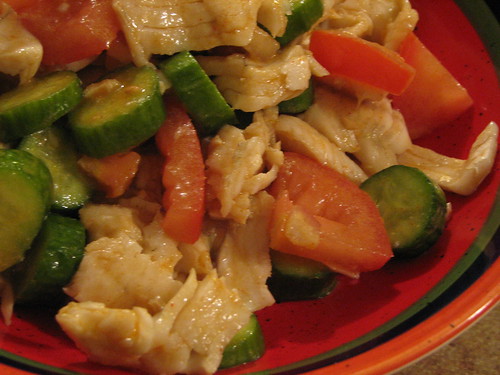
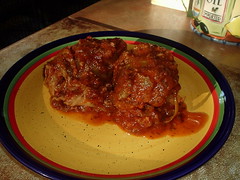
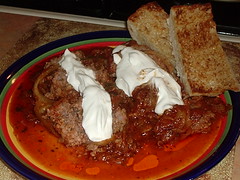
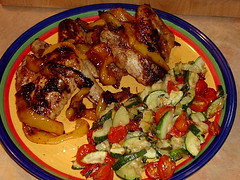
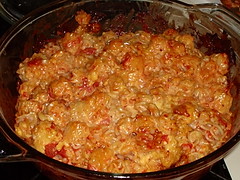
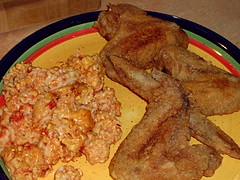
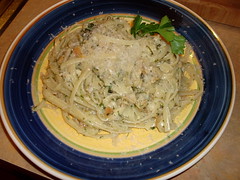
And not so much for your cooking - although it looks scrumptious. No, I love you for being one of the many celebrity chefs that put out their own line of cast iron cookware. Yours is affordable, well made and the colors in your line are perfect for my kitchen! So, thank you Mario Batali! Thank you for my gorgeous and sexy Dutch Oven that I heart so very, very muchly! :)

Oh hells yes, the love of my Dutch Oven is another reason why I chose Crockpots, Dutch Ovens and Pressure cookers for the theme of this months WCC, just so I could show off the sexiness once again! Behold and be dazzled..

My new pride and joy =)
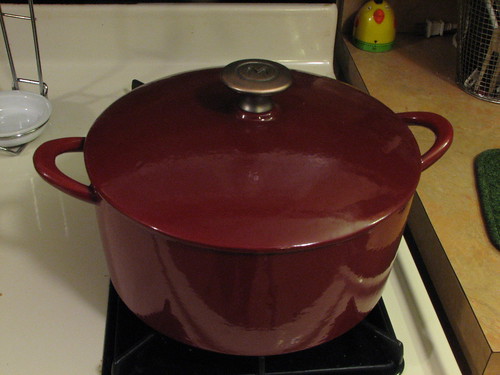
My GOD is that not the cat's meow in cast iron cookware??

Everything I make in this bad boy always turns out spectacular. I'm not exaggerating either. For instance.. my very Irish mother, makes the best Spanish rice ever and I've never been able to quite get it as good as hers - until just a few days ago. And I totally credit my success to my Mario Batali 4 quart Dutch Oven in Chianti (damn you Crate & Barrel for discontinuing to sell that color). This time it was perfect.. I dare say better than my mother's. *gasp* DON'T TELL HER!!

It turned out creamy with such a fantastic flavor. You could really taste the tomato, peppers and onion this time. In the past when I've made it, we've always had lots left over for freezing (and then eventually throwing out because of freezer burn) but there was none left this time. We had it for dinner that first night as the main course and the next night we had it as an accompaniment to Ben's Enchiladas Verde uhh Rojo. Damn store didn't have one fakkin tomatillo in the place! So we had to go with tomatoes. Not that that was a bad thing, as the sauce turned out beautifully. Thanks, Ben!! Deeeelicious! :)

Lisa's Spanish Rice
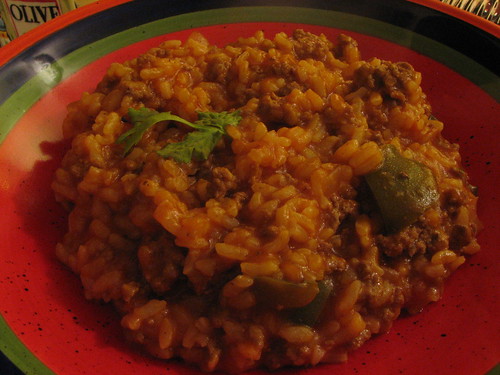
Awww lil wilty Cilantro :P

Mom's Spanish Rice

1 lb. lean ground round or sirloin
1 medium Spanish or Vidalia onion, diced small
1 medium bell pepper (whichever color that floats your boat), diced small
2 cloves garlic, minced
2 TBS. olive oil
1 32 oz. can of plain tomato sauce
1 32 oz. can of water
1 scant TBS. dried oregano
2 Bay leaves
Salt & pepper to taste
1 TBS. garlic powder (optional)
1 1/8 c. short grain white rice, uncooked

Lisa's Spanish Rice

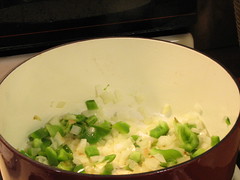
Sauté the onion, pepper and garlic in the olive oil until just translucent (about 5 minutes). Add the ground round and cook until browned, then drain any excess fat (although there shouldn't be if you are using lean round or sirloin).

Lisa's Spanish Rice

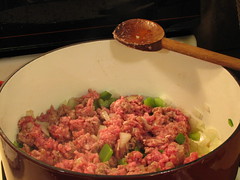
Once the meat is browned, pour in the can of tomato sauce, then fill the empty can with water and pour that in. Season with the oregano, bay leaves, salt & pepper and the garlic powder if using. Add the uncooked rice and let simmer for about 30 to 45 minutes or until the rice is tender.

Lisa's Spanish Rice Lisa's Spanish Rice

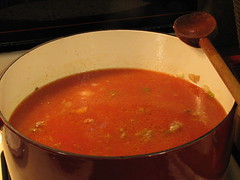
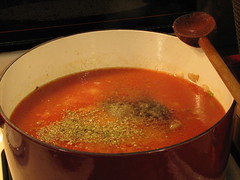
You should end up with a pot full of thick and creamy Spanish (Americanized) rice with not a lot of sauce left over. We love it this way as it resembles risotto, but it might be dry to someone else, so you can thin it by adding a little water or low-sodium chicken broth.

Lisa's Spanish Rice

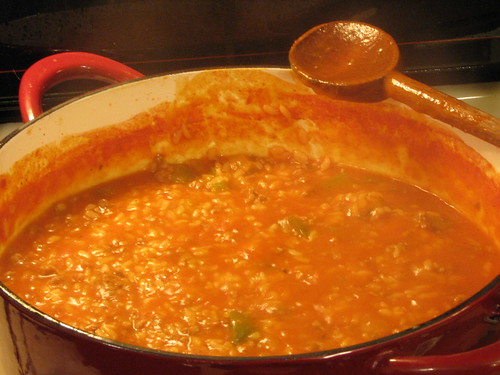
And with Ben's Enchiladas..
Ben's Enchilada.. Rojo?
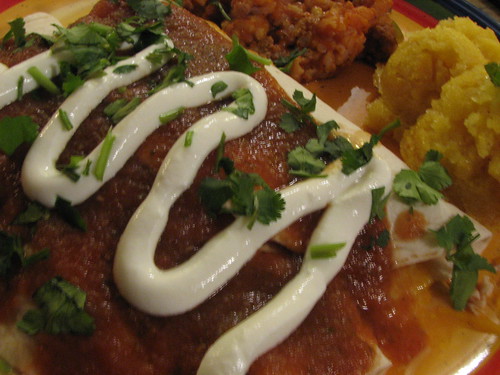
Delicious chicken Enchilada, Rojo sauce, Spanish Rice and Corn Cake. *swoon*

Beef Bourguignonne

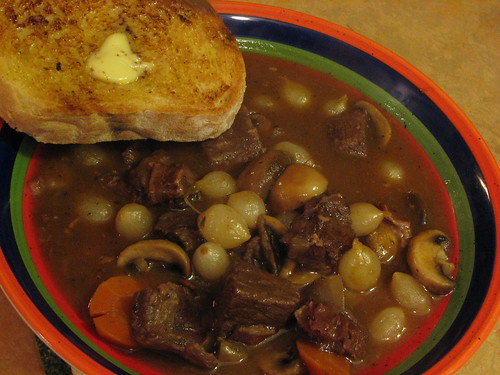
Another fantabulous, you won't be sorry, recipe to make in your sexy Dutch oven is Ina Garten's Beef Bourguignon - a big bowl of this with crusty bread for dipping.. let's just say you will want to make out with Ina afterwards. ;)

xoxo

Labels: , , , , , , , ,

Monday, March 19, 2007

Memories

My dear, sweet friend, Ellie, is holding a one off Nostalgia event in hopes that everyone will share a story about a food that brings back memories.. so how could I let her down?

Well duh. Of course I couldn't let her down. Sheesh.

I've blogged a lot about my favorite dishes enjoyed in the years growing up but somehow this one slipped my memory - maybe because I'd never tried to replicate it in my own kitchen. I was sitting at the kitchen table with Hubbs discussing this very subject. Wondering out loud what the hell I was going to write about. And as we were going back and forth about favorite foods from our childhood (because that's what I wanted to hit upon) I stunned myself by actually "misplacing" this dish in the recesses of my memory! How could I forget it? It's not like my mom made this every once in a while - hell no, it was a staple in our family's weekly dinners and I love it! My mom's chicken & noodles.. you can't get more simple and delicious than this dish.

I can't really say that I associate this dish with one memory only - instead, thinking about this stick to your ribs, comforting meal reminds me of many occasions. For example, this was the first dish that my youngest sister ate as a solid food and didn't actually spit out and fling back into my face. I remember her tasting it, as I instinctively held my hands up in front of my face, and her smiling and doing this grunt thing that she did when she was pleased with her food. That might have been the first feeding where I came out unscathed.

I remember this being dinner the night our part of the state received the worst ice storm in it's history.. sittin' all cozy, eating this yummy chickeny noodley concoction in front of the tube - most likely getting my fix of The Fonz, Richie, Potsie & Ralph Malph (what can I say? I was a sucker for the bad boys, the good lookin but vacant boys and red heads!).. and then an hour or so later, no power. Dead of winter, nothing but inches upon inches of ice outside and us with no power for 2.5 days. I will NEVER forget the kind of cold you feel INSIDE your body when you've spent over 48 hours with no heat. And this is also the reason why, I give as much money as we can to Ohio's homeless funds.. I can't even imagine how those people survive our winters. *shudder*

And finally, although the memories go on and on, the last one I want to share is that this was one of the last dinners my dad requested before he left us.. my mom came home from work (by this time, we'd shut the restaurant down and she had taken a job at the local Rite Aid) checked on him and then made this for him. And blah dee blah blah blah I can't write any more without getting all blubbery.. so yes! How could I forget this dish??

*ahem*

So without further ado.. I'll share this recipe.. make it one night when you want something comforting - use whichever chicken part you'd like.. change up the egg noodles for klusky noodles or whatever floats your noodle boat.. add more veggies or substitute a vegetable for the sweet peas.. whot evah. Just make it, I'm pretty sure you'll like it. =)

Mom's Chicken & Noodles

The recipe below will feed 4 people with generous portions

8 chicken thighs, skin on & bone in
1/2 c. flour
Salt and pepper
Enough oil to just cover the bottom of your pan
4 c. chicken stock + enough water to make enough gravy - can't give an exact measurement, you'll have to "eyeball" it.
Enough flour to thicken the gravy - I think I end up using 2-4 TBS. ?
1 can sweet peas
3 sm. cans of sliced mushrooms
1 lb. bag of egg noodles
Garlic powder to taste
Salt & pepper to taste

Heat the oil in your electric fry pan, or very large skillet if you don't have an electric fry pan. I set mine on 350º F.

Mix the flour with the salt & pepper in a shallow bowl or plate, dredge the thighs in the flour mixture. Place the thighs in the hot oil and brown on both sides. Remove and set aside.

Add the stock, water and flour to the pan and bring to a boil, stirring often, until as thick as you desire. Add the peas and mushrooms. Allow to simmer for a few minutes.

In the meantime, or even ahead, cook your egg noodles until al dente in salted water.

Mom's Chicken & Noodles

Once your gravy is thickened and your noodles are cooked, add the chicken and noodles back into the fry pan and mix well. Heat this mixture until warmed all the way though - about 10 to 15 minutes. Done!

Mom's Chicken & Noodles

Labels: , , , ,

Thursday, March 01, 2007

WCC No. 14 - Salad

My father made this salad often during his life. He loved to fish and nothing made him happier than (other than, you know, his beautiful eldest daughter) catching his limit of Lake Erie Perch. He wasn't very imaginative when it came to preparing it though - fried was usually the way to go. Well one day he decided to broil the lightly seasoned filets and then throw them into a bowl with his favorite salad mixin's - he scored big that day..

Fish Salad

There really is no recipe here - it's something that YOU make with what you like. Any mild white fish would do - simply season it with a lil salt, pepper and paprika. I like to melt a couple tablespoons of butter and brush over the filets as well. (Imagine that) And while your fish is broiling, make a big bowl of your favorite salad. I have to confess though, I've never had this type of salad with greens.. mostly it's just tomatoes and onions (I had a bunch of baby seedless cucumbers I wanted to use up this time) and peppers - dressed simply in a sprinkle of garlic salt and an emulsion of balsamic vinegar and canola oil. Mix your salad well and let it sit for a few minutes. Once the fish is done allow it to cool for a few minutes and then flake it before throwing it into the salad - give it all a mix and you've got dinner, friends. =)

These are the kinds of meals my father made that I truly enjoyed.. simple ingredients without too much fuss in the process. Delicious.

Fish Salad

I think this is a nice submission for this month's Weekend Cookbook Challenge - No. 14 Salads! This month Sara's event is being hosted by the lovely Tami of Running with Tweezers. Submissions are due by March 5th - so get 'em in to her for the big round up! As always - thanks so much for this fun event, Sara! And thank you, Tami, for hosting and picking a great theme! =)

Labels: , , , , ,

Friday, December 29, 2006

I Did It! I Finally Did It! Also.. Peabody Rocks!

For the past 3 (or is it 4?) years I've been trying, very unsucessfully, to recreate my Dad's Christmas Calamari Sauce. And lemme just tell yas.. this process has been very lonnnngggg, disasterous and heartbreaking. So let this lil post be a lesson to all you kids out there - Life is short! Do not take ANYTHING for granted! My Dad made this sauce every single Christmas Eve of his life (well his life with his family) and my Mother and I never, ever watched him do it. We never asked him to show us how to make our most favorite sauce in the world. And then he was gone.. and although we didn't even want to celebrate Christmas without him for a few years, when we were ready to bring back the traditions the way he would want us to.. we had no way of making the sauce. *sigh*

After last year's disaster, I decided that I would research any and all old Italian seafood sauces that I could get my hands on.. surely there is some Italian family out there that enjoys this sauce, eh?? By God, you'd think not after all of my failed attempts to find anything. And then one day, my Mom said to me, "You know, he cleaned squid for hours and when he boiled it, the water turned purple." Bingo! I had no idea he cleaned his own squid.. I had been buying it already cleaned and all I had to do was slice it. Duh! So this year, I bought whole squid and Hubbs and I spent an hour or more cleaning about 3 lbs. of it. Now THAT was an experience. If you've never cleaned squid before, you have no idea how many steps there are to it - as well as the ick factor. Nothin' like chopping heads off right below the eyeballs, my friends! heee!

Okay - without getting into more gorey details.. after we cleaned the squid, I managed to save a few very tiny ink sacs. We boiled the tubes and the tentacles with the ink sacks until we saw that the water was turning purple! Woo!! Frankly, I don't think the ink sacs had much to do with it though, as after I took the pieces out of the water, the sacs were pretty much still intact. I believe the color comes from the skin left on the tentacles. Anyhoo.. the rest of the process was quite easy.

My family's marinara sauce calls for tomato puree and after you dump the puree into your pot, you fill each can up with water to dilute it a bit. So I did that with this sauce as well.. only I used the water that we boiled the squid in to fill up those cans. I know he didn't season it like he did our regular marinara so I only put in salt and pepper along with all the calamari pieces parts.. and after a good 5 hours of simmering.. I had my Dad's Calamari Sauce. Finally.

Dad's Calamari Sauce - FINALLY

This picture was taken only after an hour or two of simmering so the sauce was still bright red.. when it was finished it had turned a beautiful dark red and the calamari was melt in your mouth tender.

Rather than post this recipe here, because I realize not many people are going to be interested in a tomato sauce that features squid, hehehe, and because the steps are quite lengthy to type out - I will offer to type it all up for you and send through e-mail if you are interested, just drop me a line. This sauce really is magnificent :D

And now on to the appetizer and the dessert! Both recipes are from Peabody so I will just link you to her beautiful pictures and recipes.. but I just had to share how mine turned out.. both were a smashing success and both recipes were asked for by everyone who attended. Thank you, Peabody - I am now addicted to bread pudding (which I'd never had before) and that excellent bleu cheesey/oniony-peary jammy spread! Oh! I also took the remainder of the cheesecake to work so it wouldn't go to waste and everyone there loved it as well! =)

Bleu Cheese Cheesecake w/Onion Pear Jam

This large wedge was plenty for a crowd of 9 people, I served it with butter crackers and toasted slices of baguette..

Bleu Cheese Cheesecake slice
Peabody's Bleu Cheese Cheesecake with Onion-Pear Jam

1 3/4 lbs softened cream cheese
8 oz shredded Asiago cheese
8 oz blue cheese, crumbled
5 large eggs
1/3 cup heavy cream
1/4 tsp white pepper

Grease a 9-inch springform pan.
Preheat oven to 350F.
Cream cheeses together until smooth.
Add eggs one at a time.
Add cream and pepper. Combine.
Bake uncovered in a water bath until golden brown and center is set.About 45-50 minutes.
Cool Completely, remove sides of pan.

Onion Pear Jam

4 cups onions, diced
1 tsp olive oil
2 cups pears, peeled, chopped
2 TBSP fruit vinegar
1 cup brown sugar
1/4 tsp kosher salt
1 pinch cayenne pepper

Saute onions in oil until brown. Reduce heat and cook until glazed.
Add pears, vinegar, sugar, cayenne and salt. Cook till pears are crispy tender.
Remove mixture ans simmer juice utnil a thick glaze.
Mix pear onion mixture with glaze. Cool.
Cover cooled cheesecke with jam and serve with bread or crackers.

And here are the individual bread puddings.. when making this, I had to leave out the alcohol and the nuts. I subbed vanilla for the alcohol and MY GOD it was delicious! If making individuals like I did, the baking time was reduced by only 10 minutes or so.. just until the middles felt firm when inserting a thin knife.

Individual bread pudding

Half way through devouring mine I realized I forgot to take a picture with the dreamy toffee sauce drizzled over it.. so this is all ya get to see. hehee

Dear Sweet Jebus this was good!
Peabody's Croissant Bread Pudding with Pecan Toffee Sauce

4 large croissants or 6 small ones
1 pint heavy cream
4 egg yolks
½ cup of sugar
1 teaspoon nutmeg
1 cup raisins

Preheat oven to 350F.
1.Tear croissants into pieces and place int o baking dish. Sprinkle bread with the raisins.
2.Mix the egg yolks, sugar and nutmeg together in a bowl. Then stir in the heavy cream.
3.Pour the custard over the bread. Press down the bread pieces until the bread is soaked with the custard. You will most likely have extra custard depending on how stale your crossiants are. Don’t feel like you have to use all the custard.
4.Place pan into another pan that will hold a water bath. Bake the bread pudding for 45 minutes until golden on top. Cool 10 minutes and serve warm.

Pecan Toffee Sauce

3/4 cup packed brown sugar
1/3 cup unsalted butter
1/3 cup whipping cream
1 TBSP Amaretto
1/2 cup chopped pecans, toasted
1.Stir brown sugar and butter in heavy medium saucepan over medium heat until melted and smooth, about 2 minutes.
2. Add cream and Amaretto and bring to a simmer. Simmer for about 5 minutes and then add pecans.

To see gorgeous shots of these two recipes, check out the loverly Peabody's site for the Bleu Cheese Cheesecake with Onion-Pear Jam and the Croissant Bread Pudding with Pecan Toffee Sauce - I can't describe how good both of these were.. you have to try them for yourselves! :D

Labels: , , , , , , ,

Wednesday, November 01, 2006

WCC #10 - Neglected Gadgets

Once Sara announced the theme that this month's guest host, Mary of The Sour Dough chose for WCC #10, I knew exactly which gadget I'd be using. My foodmill! I watch shows on HGTV and FoodTV where chefs use their foodmills quite often, but I only use mine when I am making my beef vegetable soup. Specifically, for the tomatoes I add to the soup.

I usually make vegetable soup once a year - at the beginning of Autumn when I start my many months of craving homemade soup. Hubbs is the main soup chef of the house, his chicken soup is to die for.. but I'm in charge of the beef vegetable variety. Although this recipe was passed to me by my loverly Mommie and not found in a neglected cookbook, I could not pass up the opportunity to contribute this recipe for WCC #10 just because of the foodmill, which usually sits on a shelf in my pantry collecting dust, poor thing.

I make my soup at this time of year because it's the perfect time to use up the last of the garden tomatoes. I boil them for just a few seconds, and then throw them into the food mill and give them a quick grind. I like them to stay a little chunky so I only turn the handle maybe 2-3 times. Just enough to pass them through, shedding their skin. The milled fresh tomatoes adds a richness to this soup that brings it over the top IMHO. Although I have nothing against throwing in canned and frozen veggies in soup, I prefer to make my beef veggie soup with all fresh ingredients, right down to the fresh bay leaves (and yeah, I will spend the $2.95 for a package of fresh bay leaves, just to use two in this recipe. I'm ca-racy when it comes to this favorite soup of mine.)

Not only does this soup have a wonderful deep beefy flavor, but it makes quite a bit and freezes well, so that you can enjoy it all through the winter months - or whenever you feel like a bowl of homemade soup! Warm from the oven breadsticks or just a handful of crackers along with a nice salad of baby greens, shaved fennel and parmigiano is all that's needed to make this soup the highlight of a cozy, comforting dinner. I hope you try it.. it's fantastic! :D

Beef Vegetable Soup
Beef Vegetable Soup

1 1/2 - 2 lb. sirloin steak, cut into chunks
2 TBS. olive oil
1 medium vidalia onion, chopped
4 cloves garlic, minced
5 carrots, peeled and sliced
4 celery stalks, wiped clean and sliced
4 garden tomatoes, boiled then ran through food mill
2-3 ears of corn, kernels sliced off cob
1 (8 oz.) carton of button mushrooms, these can be left whole or sliced thick
1 red bell pepper, chopped
1 lb. fresh green beans, snipped and cut into 1" pieces
1 med. zucchini, sliced in coins and then quartered
5 c. beef stock (I use the stock you buy in the cartons when I don't have fresh stock on hand. I do not use beef broth, it's just not flavorful enough)
2 c. water
1/3 c. soy sauce
2 TBS. Worcestershire sauce
2 fresh bay leaves
salt and freshly cracked black pepper, to taste
1/2 c. barley (optional)

In a large stock pot, brown the steak in the olive oil, then transfer to a bowl and cover with foil to keep warm. Add the onion, garlic, carrots and celery and saute until just softened. Add the next 11 ingredients and the reserved steak and bring to a boil. Turn heat down and simmer for at least 1 hour. Taste for seasoning, add the salt and pepper and the barley if using it, then simmer for an additional 30 to 45 minutes, or until the barley has softened and swelled. If the barley soaks up too much of the stock, add a little more water. You can cut the cooking time by quite a bit if you use quick cooking barley.

Labels: , , , ,

Thursday, October 05, 2006

My Mom's Goulash

Dreary, dark, rainy and chilly - that's what's happenin' in the Armpit of the Midwest. Probably any other time of the year, this weather would be slightly depressing to me, but not now. Although I do prefer the sunny, crisp days of Autumn, the rain and chill doesn't bother me - it only makes me want to curl up under the blankets with a good book or movie after, of course, I've made something that's comforting and warm to go with. Lots of options for delicious dishes when that chilly air hits.. but nothing as comforting as my Mom's Goulash. This was a staple in our family as I was growing up. She made this probably once a month even during the summer and we were all fans, regardless that we'd probably ate it 1,000 times over. =)

The pasta is interchangeable in this recipe.. I've used rotini, shells, cavatappi and elbows. Anything that allows the sauce to stick is fine. Most everyone will have these ingredients on hand in their pantries and refrigerators, so it's a dish that can be made with little to no beforehand thought. It's also a one pot meal, which makes clean up a breeze. And.. it makes a lot - so if you are into left overs for lunch the next day, this is the perfect meal!

As always, when cooking one of my Mom's recipes.. there is no real measuring. "Eyeball" it, as Rachael says - you really can't go too wrong if you taste it as you are cooking it.

I hope if you try this recipe, that it will become a family favorite for you and yours as it is to our family. =)

Mom's Goulash
Mom's Goulash

The following recipe is written exactly as my Mom recited to me.. below is how I made it last night.

3 lbs. ground round
2-3 sm. onions, chopped
1 green bell pepper, chopped
2 lg. cans of tomato sauce
2 lg. cans of water
garlic powder
onion powder
dash of oregano
2 bay leaves
salt and pepper
2-3 cans of sliced mushrooms
1 lb. springs (rotini pasta)

Saute onions & pepper in a very small amount of vegetable oil until they start to soften, add ground beef and brown. Add tomato sauce, water and seasonings. Cook until it cooks down just a bit. Add mushrooms and springs - either already cooked to al dente or they can be thrown in dry, cooking time will just take a little longer and you might have to add a little more water. Let simmer for at least 30 minutes (or until pasta is cooked if you use dry).

*Note: Just so you can see how versatile this is.. I didn't have the large cans of tomato sauce, so I used 1 large can of crushed tomatoes and 2 regular sized cans of the tomato sauce (filled each can with water). Also.. we're talking just plain tomato sauce in a can.. not marinara (Ragu, or the others). I only had 1 med. vidalia and 3/4 of a yellow pepper as well as only 1.5 lbs. of ground round.. worked fine. I'd say for the amount of tomatoes I used, the measurements for the seasonings were.. 2 heaping tsps. of the garlic and onion powders. 1 heaping tsp. of the oregano and salt. 6 turns of the pepper mill. I used 1 sm. carton of fresh sliced mushrooms. And I probably added about 3 cups of elbow macaroni, which I threw in dry - and the simmering time was still just about a 1/2 hour as the elbows were small. Also, I like a lil sprinkling of grated Pecorino Romano on top. It's not rocket science.. use what you have and don't sweat it. :D

Also! This is her chili recipe as well.. sub kidney beans for the pasta and spice it up with hot pepper flakes and a diced jalapeno or two. =) No wait, there's more! hehehe This is also her Mexican Rice recipe! I know!! Sub rice for the pasta and you're good to go! tee! :)

Labels: , , , ,

Friday, July 07, 2006

Mom's Cabbage Rolls

I hit the dinner lottery last night.. my Mom called me at work to tell me that she had made a batch of cabbage rolls and she'd like me or Hubbs to stop by and pick some up. Hooray! I got a break from cooking, which meant I could spend some quality time out on the swing by the pond - something I was wishing I could do as yesterday was an exhausting day.

I'm posting my Mommie's cabbage rolls because they are too good not to share and I make mine the exact same way (well, duh!) just not very often. Her cabbage rolls are on the larger side, the cabbage is always fork tender and her stuffing is the perfect amount of tasty meat and rice. She makes them in the morning and then slow cooks them in her oven all day. Nothing is needed when having Mom's cabbage rolls other than a lil sour cream and a crusty bread to sop up all the delicious sauce and juices :D

Mom's Cabbage Rolls
Mom's Cabbage Rolls

1 head cabbage
3 lbs. ground chuck
2 eggs, beaten
1/2 c. minute rice
3 tsp. salt
2 tsp. pepper
1 lg. vidalia or spanish onion
5-6 cloves garlic
small amount of water
2 lg. cans of tomato puree
2 lg. cans of water
2 TBS. dry basil
3 TBS. dry parsley
1 TBS. oregano
2 tsp. salt
1 tsp. pepper

Preheat oven to 350º F.

Using a sharp knife, cut a square around the core of the cabbage - you aren't trying to take the core out, you are just making deep slices on each side of it to allow peeling of the leaves. Boil head of cabbage in large pot until it's soft and pliable - about 20 minutes. Being extremely careful, use a spaghetti fork (That's what we call them.. the really long fork with 2 tines that's also used in carving meat) to lift the cabbage out of the hot water, allow it to drain a bit and then transfer it to a counter top that has a clean kitchen towel spread over it. Start peeling off the tender leaves. Once you get to the leaves that aren't as tender, place the head of cabbage back in the boiling water to cook a little longer. You want your leaves to be tender, but not so soft that they will burst open when rolling them around the filling - I guess you could say you'd want them almost al dente (If there is such a thing for cabbage? heee!) Place the leaves on the towel to drain.

Once you've got all the leaves separated and draining, cut up the onion in large chunks and smash the garlic. Place the garlic and onion in a blender with a small amount of water to help the blades work through it and puree them. Transfer pureed onion and garlic to a large saucepan and add the tomato puree, water, basil, parsley, oregano, salt and pepper. Mix well and set aside.

In a huge bowl, combine the ground round, eggs, rice and salt & pepper well with your hands.

Place about a large golf ball size amount of the meat mixture not quite in the middle of a cabbage leaf. Roll until filling is just covered, then fold left end over towards middle, roll once more and then tuck the right side into the middle, inserting the leave into the meat mixture with your finger. Secure with a toothpick, if needed.

Cover the bottom of a large roasting pan with a thick layer of the sauce, place rolls on top and then more sauce over the rolls.

Bake for AT LEAST 2 hours.. but you'll find more like 3 to 4 hours is best.

Mom's Cabbage Rolls

Labels: , ,

Tuesday, April 25, 2006

Pizza Snob

I don't think I mentioned in my 100 list, and I'm shocked that I didn't.. I'm a total pizza snob. There is only one pizza I'll eat, the kind my Aunt Ann taught me to make. Rarely I'll be forced to eat delivery pizza, but believe me, only if I'm starving and sooooooooooooooo tired that I can barely slave over a hot phone - and those times I mostly order Chinese or subs. I grew up on my Auntie's pizza. She is known throughout the land as the Pizza Lady and there are (seriously) dozens of kids that grew up in her neighborhood (and surrounding neighborhoods) that would show up at her house every Friday night for a slice or two of the thinnest, most delectable pizza EVER. Actually my sisters and I were the unfortunate ones. We lived across town and we didn't get to go to my Auntie's house every single Friday because of our restaurant. But my parents did manage to get us there often and even if it wasn't Friday, she'd make us her pizza. I love my Auntie soooooooooooooo much!! She's a wonderful lady that everyone loves upon meeting her once.

Two years ago, we made a date for her to teach me how to make the pizza. I felt especially honored, since she had taught no one else before me and so far, no one after me. And believe me, I take this pizza making stuff seriously. I keep plugging away and will continue to until I have mastered her pizza. The dough keeps getting better and better, but I don't think it's quite there yet - still needs a lil tweaking. My mother says it's there. Hubbs and friends of ours love it (but he nor they have ever had my Aunt's - so they don't count lol) but I'm not satisfied yet. I'm just going to have to keep making pizzas.. yep, it's a dirty job.. but someone's gotta do it. (gladly!)

Twins! before

You might think I've made a typo when you see that we use 3 packets of dry active yeast to 1 cup of water instead of the "normal" 1 packet to 1 cup of water, but I haven't. That extra yeast is what gives my Aunt's pizza it's distinctive flavor. Furthermore, you might be shocked to see that I don't put sugar in with the yeast nor do I put any salt or oil in the dough. I'm trying to stay as authentic to my Aunt's teachings as I can and she never uses any of those ingredients. She did not use fresh vegetables, herbs or garlic in her pizza sauce and she did not use a pizza stone, so this recipe might even sound a bit barbaric to some. But it's still the best pizza I've ever had. Granted, I can't help but want to experiment with ingredients and flavors - I've started a list already - but until I feel I've mastered her way, it's going to stay her way. Yanno? =)

Twins! After
Auntie Ann's Pizzas

For the Dough:
3 (1/4 oz.) packets of dry, active yeast
1 c. lukewarm water

4 to 6 cups of all-purpose flour (6 c. will make 6 thin pizzas, 4 c. will make 3 thin pizzas)
additional water

Dissolve the yeast in the 1 cup of water, let sit for 5 minutes.
If you have a stand alone mixer, use the bread dough hook and mix the flour with the yeast mixture, adding tablespoons of water as needed if your dough looks dry. Continue to mix until dough forms a ball.

Place dough ball onto well floured flat surface and knead for 5 minutes. Form into tight ball and put in a large, oiled bowl covering with a just damp clean kitchen towel (just drape towel over bowl, don't form it around dough). Place bowl in a warm, dry area. Let the dough sit and double in size (roughly 1 hour), punch the dough down and allow it to rise once again.

For the Sauce:
1 (29 oz.) can of tomato sauce
The rest of the ingredients are to taste, but here's what I used my last batch:
1 TBS. parsley
1 TBS. onion powder
1 TBS. garlic powder
1 tsp. oregano
2 tsp. basil

Simmer for an hour or longer, stirring occasionally.

Toppings:
Whatever your lil heart desires =)

Pizza1 after

To prepare the pizzas:
Preheat oven to 400º F.

Grease your pizza pans with shortening. I'm talking the white lard Crisco type stuff. Oil can definitely be used, but I find spreading the dough goes much easier with something not so "slippery". Place a softball sized wad of dough in the middle of your pan and start spreading it out working it so that you are spreading from the middle to the edges. This causes less holes in such a thin crust. If you do encounter holes, either pinch them shut if you've got enough dough or add a little "dough patch" - but make sure you have no holes before you add your sauce.

Once you have the dough spread, place pizza sauce on top and spread it to about 1/2 inch from the edge (or you can be like me and "slip" every once in a while so that you get a lil burnt sauce on your crust :D ) then add your toppings. Always keep in mind, try not to overload your pizza, the thin crust won't get crispy if you do.

Place in preheated oven and bake for 20-25 minutes. Check your pies and if they look all golden brown and bubbly, they are done. Another step I take to see if they are done is I carefully slide a wide metal spatula underneath and lift the crust a bit to see if it's brown underneath near the middle. If it is, done - done - done =)

Labels: , ,

Sunday, April 23, 2006

Are you starting to see a theme here?

After Friday night's bomb of Mushroom Ragù with Soft Polenta, I opted for an old standby on Saturday night that I knew would be delish and wouldn't take forever. I also realized.. wow I eat a lot of wings!

There really isn't a "recipe" for this dish.. you simply salt, pepper and paprika your wings and place in frying pan with a teeny amount of oil in it.. just barely enough to cover the bottom. Brown your wings on each side and then add sliced up bell pepppers. The more peppers the better. Usually when I make a whole batch of these wings (a whole family-sized package - 14 to 16 whole wings?), and not just a few for just me, I end up using at least 4 whole peppers if not 5. When I cut it down to 6 wings last night I used 2 whole yellow peppers. The color of the pepper doesn't really matter, but the length of time you cook them does. You really want the peppers to get soft and carmelized. If a few of them look burnt, even better - they have a fantastic taste when they are soft yet almost black looking. The wings take between 25 and 35 minutes to cook all the way through, but if your peppers aren't quite done by then, you can remove the wings and allow the peppers to keep cooking. Sometimes I'll add onions with the peppers, which Hubbs loves. =) I did a simple roasting of zucchini and halved grape tomatoes with olive oil, salt & pepper and some herbs I had left in the fridge.. thyme and sage. But you can use any herbs you like or none at all. I roasted them at 450º F. for about 20 minutes.

Wings w/peppers
Wings with Peppers and Roasted Veggies

Labels: , , ,

Sunday, April 16, 2006

Craving Mom's cooking

Sunday already.. Happy Easter everyone!

It was a very uneventful week in my little kitchen. I was so happy for the nice weather that I spent most evenings after work outside with the dogs. By the time we came in, I had about enough energy to open up a bag of seasoned noodles or a package of hotdogs :) Friday it was my linguine & clam sauce again (I really think I could live off that dish). Saturday I woke up with lots of energy.. I had cleaned my house and did my laundry all before 9 am! That doesn't happen often lol

I also woke up with a HUGE craving for some of my mom's cooking. I thought about calling her and asking her if she'd cook for her favorite daughter, but we were having my neices and their parents over, so I knew we'd go out for lunch and she would not feel like cooking later. *sigh* I guess if I wanted to satisfy this craving, I'd have to cook it myself.

My absolute favorite dishes she made me as I was growing up were Linguine and Clam Sauce (imagine that!!) paired with slow cooked BBQ ribs. Quite a combo, eh? But, gawd I loved it and always asked for that on my birthday. Next in line, was her fried chicken wings with macaroni and cheese.. and that's what I was jonesin' for Saturday morning. The wings are super simple.. just flour, salt & pepper. She throws all that with the wings in a big bag, shakes it up and then fries the wings to a goldeny brown perfection. Yum! Hubbs had never had fried wings before I had met him.. he thought wings were only made with buffalo sauce and served with blue cheese dressing and celery. He's now addicted too and asks for these quite often.

Mom's Mac & Cheese

My mom's mac & cheese? Well that's a different story.. she adds tomatoes to it and he just doesn't like that (so he says, but on the rare occasions that I'll make it he ALWAYS goes back for seconds - sometimes thirds, go figure). I don't know where my mom got this recipe or if she was just experimenting one day, but it was a huge hit with the family. Three ingredients is all it takes. One of which is Velveeta processed cheese. This recipe is the only way I'll eat Velveeta.. just not a huge fan of the stuff, but I keep in on hand as Hubbs loves his Velveeta and green pepper sandwiches. (ugh)

Mom's Wings & MC

Mom's Mac and Cheese


1 lb. medium shell shaped pasta (I used Radiatore for something different this time)
3/4 of a "loaf" of Velveeta cheese, diced
2 (14.5 oz.) cans of whole tomatoes broken up in blender - not pureed (I didn't have whole tomatoes so I used crushed tomatoes and they worked fine)

Preheat oven to 350º F. Bring 6 cups of water to a boil, then season with salt.

Cook the pasta until al dente, you don't want to overcook the pasta as it will go into the oven and continue cooking.

In a 3 quart casserole dish, combine the cooked pasta, Velveeta and tomatoes, then cover.

Place in pre-heated oven for 30 minutes to melt the cheese. Stir before serving.

Labels: , , , , ,

Friday, March 24, 2006

This is the recipe everyone wants.. and it's inexpensive!

Hubbs came home last night for his long weekend before having to go back to Arkansas for at least another month. It was such a great night.. we sat around our dining room table and just bs'd for hours. I had missed that so much. Today we both have early morning appointments and then we're just gonna hang out together - yay! Tomorrow is going to be even better as I discovered there is a Trader Joe's not too far from where we live so we're gonna go check it out!

For his first night home, I made one of his favorite meals. Linguine and Clam Sauce. This recipe has been in my family for many, many years. My father use to love experimenting with recipes, and admittedly, some were.. hmm.. strange. But he was right on with this one! I've yet to meet anyone who did not want this recipe after they've tasted it. And the ingredients are so simple and inexpensive! This is not your high end Linguine and Clam Sauce, but my guess is that it will be, at least, one of the best you've tasted.

Linguine with Clamsauce

Hank's Linguine and Clam Sauce

1 lb. uncooked linguine
2 tbs. olive oil
5-6 cloves minced garlic
4 (6 oz.) cans chopped or minced clams
1 heaping tbs. dried oregano
4-5 heaping tbs. dried parsley
2 eggs, seasoned (S&P) and gently beaten
Pecorino Romano - grated *There is no real measurement to the cheese. Add to your taste. You will need at least a good handful or two for a pound of pasta to get the right consistency of creaminess.

Bring 6 cups of water to a boil. Add a good amount of salt and the linguine. Cook until al dente, approximately 7 to 10 minutes.

While the water is coming to a boil, in a small saucepan, saute the garlic in the olive oil until it is golden brown. Add clams, oregano and parsley and simmer for 10 minutes.

Drain pasta (but do not rinse-you'll need the starch) and transfer to a 9" x 13" x 2" Pyrex glass baking dish (or something similiar that you can really mix everything up in), pour the eggs over the hot pasta and mix throughly. You don't want the eggs to scramble, but you want them to evenly coat the pasta. Add a good handful of the cheese and mix well.

Using a slotted spoon (or similar to scoop out the clams from the broth) add as much of the clam mixture as you can get, leaving the broth in the saucepan. Mix well. Add more cheese. Then start adding the broth, a little at a time, mixing well until the sauce evenly coats the pasta and turns creamy.

Serve immediately with a fresh garden salad and garlic bread.

Serves 4

*Note: If the raw eggs make you squeamish, I would think you could leave them out without there being a huge difference in taste.

This is going to be a two-fer for me because it fits the bill for 2 great round ups this month! My first submission will be for this month's VRC at The Savory Notebook Look for everyone's most requested recipe at the end of the month! The other round up that this dish is perfect for is Something for Nothing at Toast where Lindy is looking for tasty, creative and budget friendly recipes. I'm looking forward to seeing what everyone will come up with for both of these round ups =)

Labels: , , , , ,